Upgrading your shower doesn’t need to be hard. You can install a shower head and hand held shower combo with basic tools and easy steps. Whether you’re enhancing your bathroom or making it more functional, this project allows you to personalize your shower experience.
Key Takeaways
Get tools like a wrench, plumber’s tape, and shower head kit. Being ready helps make the job easier and faster.
Pick a dual shower head that works for you. Check for spray options and water filters to improve your shower.
Follow simple steps like turning off water and cleaning parts. Make sure there are no leaks for a better shower experience.
Gather the Right Tools and Materials
Tools you need for a handheld shower head
Get your tools ready before starting. This makes the job easier. The right tools save time and avoid problems. Here’s what you’ll need:
Plumber’s tape to stop water from leaking.
A cloth to clean dirt and old tape.
A shower head kit with a head, hose, and bracket.
Optional: A diverter valve if keeping your old shower head.
Instructions from the kit to guide you step by step.
Using a pre-made shower kit? Great! These kits have clear instructions and ready-to-use parts. Even beginners can follow them easily.
Picking the right dual shower head
Choosing the best dual shower head is important. Look for features like spray settings, water pressure, and filters. For example, the Cobbe DS Filter Shower Head has five spray options, like rain and massage. It also filters out chlorine and metals for cleaner water. It’s stylish and affordable, with colors like Matte Black and Chrome to match your bathroom.
Think about what you need. Do you want a handheld head for flexibility? Or a fixed head for steady water flow? A dual shower head gives you both options, making it a great choice.
Getting your shower ready to install
Getting ready is as important as installing. Follow these steps:
Turn off the water to stop leaks while working.
Use a wrench or pliers to take off the old shower head.
Clean the shower arm threads with a cloth to remove dirt.
Wrap plumber’s tape around the shower arm threads for a tight fit.
After installing the new shower head, check for leaks and tighten if needed.
These steps help make the installation safe and easy. Preparing well avoids mistakes and saves time later.
Remove the Existing Shower Head
Steps to safely remove the old shower head
Taking off your old shower head is easier than you might think. Start by turning off the water supply to avoid any unexpected sprays. Next, grab a wrench or pliers to loosen the shower head. Wrap a cloth around the fixture before using the tool to prevent scratches. Once it’s loose, twist it off by hand. If it’s stuck, don’t panic—apply a bit of penetrating oil and wait a few minutes. This should make it easier to remove.
Cleaning the shower arm threads for a secure fit
After you remove the old shower head, you’ll notice some residue or old plumber’s tape on the shower arm threads. Use a clean cloth to wipe away dirt, rust, or leftover tape. For stubborn grime, a soft-bristle brush works wonders. Once the threads are clean, wrap them with fresh plumber’s tape. This step ensures a tight seal and prevents leaks when you install the new shower head.
Avoiding common mistakes during removal
Removing a shower head might seem straightforward, but a few common mistakes can cause trouble. Here’s a quick guide to help you avoid them:
Mistake |
Description |
Solution |
|---|---|---|
Many think these materials don’t need extra waterproofing, but this can lead to water damage. |
Always install waterproofing up to the shower head or higher. |
|
Creating little or no slope-to-drain |
Without proper slope, water can pool and cause damage. |
Ensure a 2% slope and keep weep holes open for drainage. |
By keeping these tips in mind, you’ll avoid unnecessary headaches and set yourself up for a smooth installation.
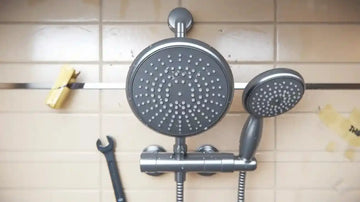
Install the New Dual Shower Head and Handheld Combo
Attaching the diverter valve correctly
The diverter valve lets you switch between the fixed and handheld shower heads. Installing it properly is important for smooth use. First, wrap thread seal tape around the shower arm threads. This helps stop leaks and keeps the connection tight. Then, screw the diverter valve onto the shower arm by hand. Use a wrench or pliers to gently tighten it, but don’t over-tighten to avoid damage.
Place the diverter valve where it’s easy to reach. Usually, 10-15 inches above the mixing valve works well. If your shower setup needs changes, make sure the valve stays accessible. After attaching, test the valve by turning it to check if it switches easily between the two shower heads.
Tip: The Cobbe DS Filter Shower Head is light, making it simple to connect without stressing the fixture.
Securing the fixed shower head
Installing the fixed shower head is easy if you follow these steps. First, check that the rubber washer is inside the threaded part of the shower head. This washer stops water from leaking. Next, screw the shower head onto the diverter valve by hand. Use a cloth to protect the finish, then tighten it more with a wrench.
Follow these steps for a proper installation:
Wrap thread seal tape around the diverter valve threads.
Make sure the rubber washer is in the shower head.
Hand tighten the shower head onto the diverter valve.
Use a wrench for extra tightening, especially for metal parts.
Position the fixed shower head at least 84 inches high. This height works for taller people but is still reachable for shorter users. After installing, turn on the water to check for leaks. If there are leaks, tighten the connections a bit more until they stop.
Connecting the handheld shower head and hose
The handheld shower head makes your shower more flexible. Connecting it is simple if you follow these steps. Start by wrapping thread seal tape around the threads of the shower holder bracket. Screw the bracket onto the diverter valve by hand, ensuring the rubber washer is in place. Tighten it gently with a wrench for a secure fit.
Next, attach the hose. Check that rubber washers are inside both ends of the hose. Hand tighten one end to the handheld shower head and the other to the bottom of the shower holder bracket. Use a wrench to tighten more if needed. Place the handheld shower head into the holder bracket. Make sure it’s secure but easy to remove when needed.
Here’s a simple checklist for connecting the handheld shower head:
Take off old thread seal tape and clean the shower arm.
Wrap new thread seal tape around the threads.
Attach and tighten the shower holder bracket.
Connect the hose to the handheld shower head and bracket.
Place the handheld shower head into the holder.
Check for leaks and adjust connections if needed.
Note: The Cobbe DS Filter Shower Head filters water, giving you clean and safe water through both shower heads for a better experience.
Ensure a Leak-Free Installation
Using Teflon tape for a tight seal
Teflon tape helps stop leaks and is easy to use. Wrap it around the shower arm threads before attaching parts. Always wrap in the same direction as you’ll screw on the fittings. This keeps the tape from coming loose.
Why does Teflon tape work so well?
It fills small gaps in the threads to block water.
It acts as a sealant and makes screwing parts easier.
It helps your installation last longer without leaks.
Pro Tip: Use 2-3 layers of Teflon tape. Too much tape makes parts hard to screw on, and too little won’t seal well.
Testing for leaks and making adjustments
After installing, check for leaks by turning on the water slowly. Look at all connections for drips. If you see any, tighten the parts a bit more and check again.
Here are some common ways to test for leaks:
Testing Method |
Description |
|---|---|
Metered Test Setup |
Measures water flow, including leaks from the ball joint. |
Time-Volume Test Setup |
Collects water over time to check for leaks and flow rate. |
Maximum Leakage Rate |
ASME A112.18.1 allows up to 0.01 gallons per minute from ball joints. |
If you have a handheld shower head, test it in different positions. Make sure there are no leaks when the hose moves. Adjust fittings until everything is secure.
Note: The Cobbe DS Filter Shower Head is made to reduce leaks, but proper setup is still important for a perfect seal.
Final tightening and securing tips
The last step is to make sure all parts are tight and secure. Check every connection again. Tighten them firmly, but don’t over-tighten, as this can damage threads or washers.
Here are some tips for a perfect finish:
Check all bolts and fittings after turning on the water.
Lubricate bolt threads to make tightening smoother and more even.
Think about temperature changes that might affect materials and adjust if needed.
Reminder: Use a wrench or pliers carefully. Wrap a cloth around parts to avoid scratching the finish.
By following these steps, your shower system will be leak-free and ready to use. Enjoy your upgraded shower with confidence!
Test and Adjust Your New Shower System
Checking water pressure and flow
After setting up your new shower, test the water. This helps ensure it works well and gives a great experience. Use these simple ways to check water flow:
A flow meter measures Gallons Per Minute (GPM) easily.
Fill a marked bucket and time how fast it fills.
Use a measuring cup, collect water, and calculate GPM.
To check water pressure, get a pressure gauge from a store. Attach it to the shower arm or hose bib. Turn on the water fully and wait for it to stabilize. Normal home water pressure is between 40 psi and 80 psi. If it’s too high or low, adjust plumbing or call a plumber.
Adjusting the handheld shower head for comfort
The handheld shower head is flexible and easy to use. Try different spray settings to find your favorite. Options like rain, mist, or massage suit different needs. Mist is gentle for sensitive skin, while massage helps relax muscles.
Bathing kids or pets? The handheld head makes it simpler and fun. Adjust the holder bracket’s height and angle for the perfect water spot. Small changes can make your shower routine much better.
Maintaining your dual shower head for long-term use
Keep your dual shower head working well with regular care. Clean the nozzles to stop mineral buildup. Wipe them with a cloth or soak in vinegar. Check the hose and connections for leaks or damage. Tighten or replace parts if needed.
For filtered models like the Cobbe DS Filter Shower Head, change filters as recommended. This keeps water clean and chlorine-free. Taking care of your shower system helps it last longer and work like new.
Switching to a shower head and handheld combo is simple and fun. It gives you adjustable spray options, stronger water flow, and a relaxing feel. Best of all, you can set it up quickly. Upgrade your bathroom with a sleek design that makes showers feel special every day.
Tip: Choose eco-friendly models like the hai smart shower head to save water and stay comfortable.
FAQ
How much time does it take to install a dual shower head?
It takes 30 minutes to an hour. With good tools and planning, you might finish quicker.
Is professional help needed for installation?
No! Most dual shower head combos, like the Cobbe DS Filter Shower Head, have simple instructions. You can do it yourself with basic tools.
When should I change the filter in a filtered shower head?
Change the filter every 4-6 months. This depends on how much you use it and your water quality. Check the manufacturer’s guide for exact details.
Tip: Changing filters often gives you cleaner water and better results!